Education*
Devops
Architecture
F/B End
B.Chain
Basic
Others
CLOSE
Search For:
Search
BY TAGS
linux
HTTP
golang
flutter
java
fintech
개발환경
kubernetes
network
Docker
devops
database
tutorial
cli
분산시스템
www
블록체인
AWS
system admin
bigdata
보안
금융
msa
mysql
redis
Linux command
dns
javascript
CICD
VPC
FILESYSTEM
S3
NGINX
TCP/IP
ZOOKEEPER
NOSQL
IAC
CLOUD
TERRAFORM
logging
IT용어
Kafka
docker-compose
Dart
sshfs
Recommanded
Free
YOUTUBE Lecture:
<% selectedImage[1] %>
yundream
2023-03-06
2016-01-16
154998
## 소개 SSH를 연결해서 SFTP 혹은 SCP로 파일을 전송하는 것은 일반적인 방법이다. 하지만 경우에 따라서 두 환경간에 전체 디렉토리를 공유해야 할 수도 있다. 전체 디렉토리 혹은 파일시스템에 대한 공유가 필요할 때는 SMB, NFS 마운트를 구성하기는 하지만 상당히 복잡한 추가적인 설정이 필요하다. SMB나 NFS 대신 **SSHFS**를 이용하면 SSH만 사용해서 두 서버간 디렉토리를 마운트 할 수 있다. 추가적인 애플리케이션의 설치와 설정이 필요하지 않기 때문에 즉시 구성이 가능하다는 커다란 이점이 있다. 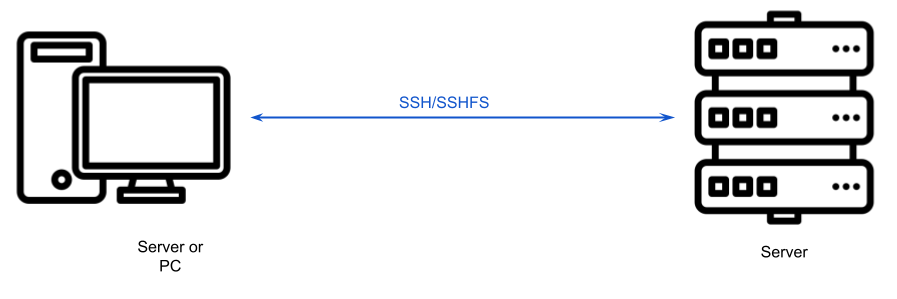 ## SSHFS 설치하기 SSH 연결이 된 두 개의 리눅스서버가 필요하다. ```shell $ sudo apt-get update ``` sshfs 패키지를 설치한다. ```shell $ sudo apt-get install sshfs ``` ## 원격 파일 시스템 마운트 리눅스에서 원격 시스템을 마운트하기 위해서는 마운트를 할 "빈" 디렉토리가 있어야 한다. 마운트 디렉토리의 위치는 마음대로 정할 수 있지만 보통 리눅스에서는 **/mnt** 디렉토리에 마운트 한다. 테스트를 위해서 **joincedu** 디렉토리를 만들었다. ```shell $ sudo mkdir /mnt/joincedu ``` **ssfs**를 이용해서 원격 디렉토리를 마운트한다. ```shell $ sudo sshfs -o allow_other,default_permissions user@your_other_server:~/ /mnt/joinc ``` **-o**는 마운트와 관련된 추가 옵션을 설정하기 위해서 사용한다. **allow_other**는 다른 유저도 마운트 디렉토리를 사용 할 수 있도록 하며 **default_permission**은 각 사용자의 권한으로 사용할 수 있도록 한다. **user@your_other_server**:~/, "**user**"는 원격 사용자 이름이며 "**your_other_server**"는 원격 호스트의 IP 혹은 도메인 이름이다. "**:**" 뒤에는 마운트할 원격 디렉토리를 설정한다. ### 마운트 테스트 마운트 한 디렉토리에서 ls 및 파일 작업(rm, touch, mkdir)등을 하면 된다. ```shell $ cd /mnt/joinc $ ls file1.png file2.png ``` ### 마운트 해제 원격 디렉토리를 더 이상 사용하지 않는다면 **umount**로 마운트를 삭제한다. ```shell $ sudo umount /mnt/joinc ``` ## 연결실패 sshfs 할 때 가장 흔하게 마주하게 되는 에러 메시지는 **connection reset by peer**이다. ```shell $ sudo sshfs -o allow_other,default_permissions ec2-user@example.com:/home/ec2-user joincedu read: Connection reset by peer ``` 연결실패가 발생하는 원인의 90%는 **SSH Key** 때문에 발생한다. 이 문제는 보통 **IdentityFile** 옵션을 이용해서 SSH Key를 설정하는 것으로 해결 할 수 있다. ``` -o IdentityFile=Your_SSH_Private_Key ``` ## 예제 #### Motivation 나는 집에 리눅스 데스크탑, 리눅스 노트북, 윈도우 데스크탑 총 3개의 장비를 가지고 있다. 리눅스 노트북에는 개인 파일들이 있는데, 리눅스 데스크탑에서 공유하기를 원한다. #### SSH Key-Pair 생성 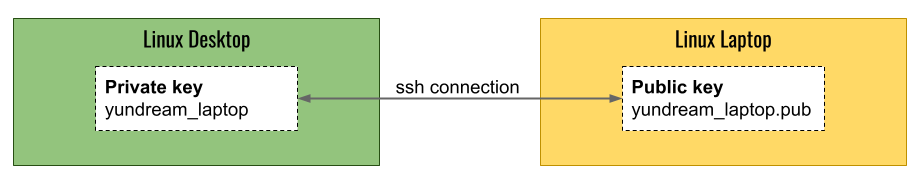 리눅스 데스크탑에서 SSH Key Pair를 생성한다. ```shell yundream-desktop $ ssh-keygen -t rsa Generating public/private rsa key pair. Enter file in which to save the key (/home/yundream/.ssh/id_rsa): yundream_laptop ``` 현재 디렉토리에 2개의 파일이 만들어진다. yundream_laptop과 yundream_laptop.pub 두 개의 파일이 만들어진다. private key는 400으로 권한을 설정한다. ```shell yundream-desktop $ chmod 400 ~/.ssh/yundream_lap ``` yundream_laptop.pub 파일을 로그인하려고 하는 리눅스 노트북의 .ssh/authorized_keys 파일에 추가하면 된다. ```shell yundream-laptop $ cat yundream_laptop.pub >> ~/.ssh/authorized_keys ``` ssh 연결 테스트를 해보자. ``` yundream-desktop $ ssh -i ~/.ssh/yundream_lap yundream@192.168.35.93 ``` ## SSH Key로 연결하도록 설정 기본 SSH Server 설정은 **패스워드 인증**이다. 패스워드로 인증해도 상관없긴 한데, ssh key로 인증하는게 보안 및 운영 관점에서 좋으니 설정을 변경하도록 하자. yundream laptop 에서 아래와 같이 작업한다. **/etc/ssh/ssh_config** 파일을 열어서 PasswordAuthentication 를 no(기본 yes)로 설정한다. ``` PasswordAuthentication no ``` ssh 서버를 재 시작한다. ```shell sudo systemctl restart ssh ``` ## sshfs 마운트 ssh 연결을 성공했으니 이제 마운트만 하면 된다. **/mnt/yundream_laptop**에 마운트하기로 했다. ``` $ sudo mkdir /mnt/yundream_laptop ``` sshfs로 마운트해보자. ```shell sudo sshfs -o IdentityFile=/home/yundream/.ssh/yundream_lap -o allow_other,default_permissions yundream@192.168.35.93:/home/yundream /mnt/yundream_laptop ``` ### 마운트 정보 확인 mount 명령으로 보는게 가장 빠르다. ```shell mount | grep sshfs ec2-user@52.78.71.118:/home/ec2-user on /mnt/joincedu type fuse.sshfs (rw,nosuid,nodev,relatime,user_id=0,group_id=0,default_permissions,allow_other) yundream@192.168.35.93:/home/yundream on /mnt/yundream_laptop type fuse.sshfs (rw,nosuid,nodev,relatime,user_id=0,group_id=0,default_permissions,allow_other) ```
Recent Posts
Vertex Gemini 기반 AI 에이전트 개발 06. LLM Native Application 개발
최신 경량 LLM Gemma 3 테스트
MLOps with Joinc - Kubeflow 설치
Vertex Gemini 기반 AI 에이전트 개발 05. 첫 번째 LLM 애플리케이션 개발
LLama-3.2-Vision 테스트
Vertex Gemini 기반 AI 에이전트 개발 04. 프롬프트 엔지니어링
Vertex Gemini 기반 AI 에이전트 개발 03. Vertex AI Gemini 둘러보기
Vertex Gemini 기반 AI 에이전트 개발 02. 생성 AI에 대해서
Vertex Gemini 기반 AI 에이전트 개발 01. 소개
Vertex Gemini 기반 AI 에이전트 개발-소개
Archive Posts
Tags
linux
Linux command
system admin
Copyrights © -
Joinc
, All Rights Reserved.
Inherited From -
Yundream
Rebranded By -
Joonphil
Recent Posts
Archive Posts
Tags